Embedded Programming Week
individual assignment:
read a microcontroller data sheetprogram your board to do something, with as many different programming languages and programming environments as possible
I use ATTINY44 in Electronic Design Week in this week I would to program it, so start with the datasheet

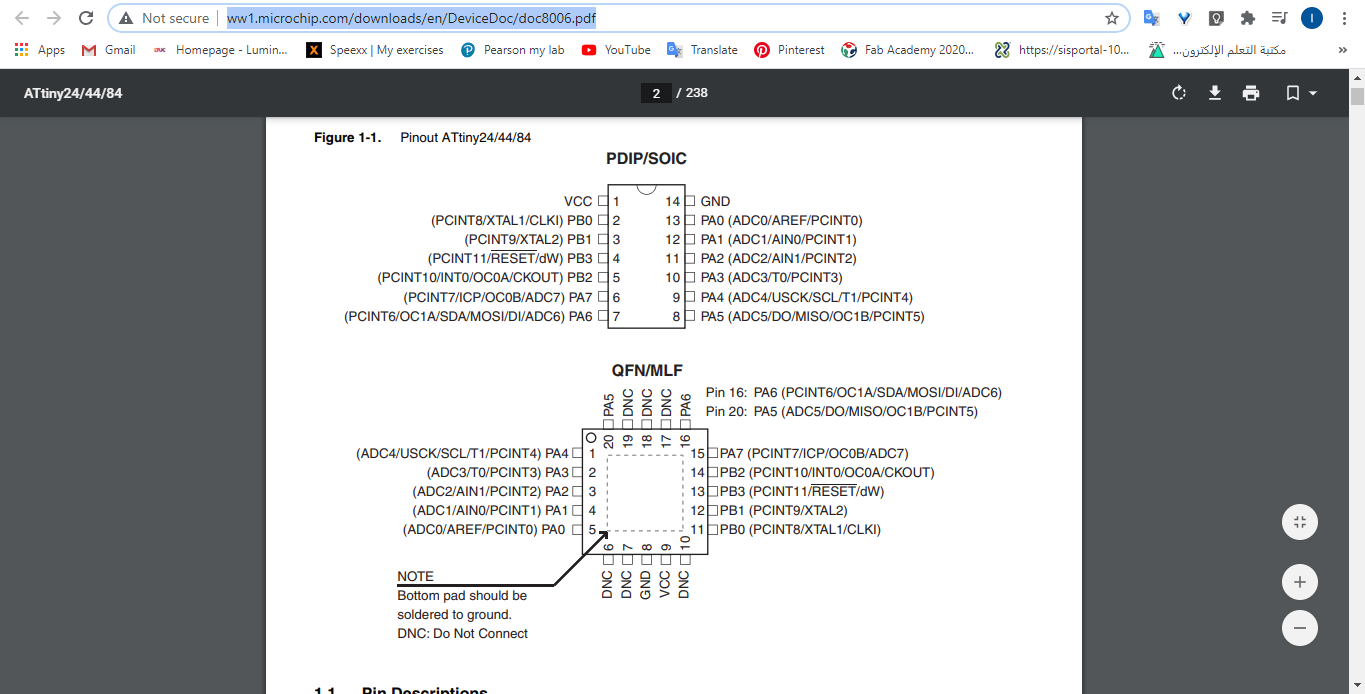
Datasheet ATTiny44 Datasheet
All of the electronic components must have a datasheet, that is a very extensive (generally) sheet of text that specifies every part of the component, from how to program it, to the general pins, and in the case of the microcontrollers, how to modify the clock inside the component.

The first part is very important to read is the pinout section. Must of the components have one. There it is specified what does every pin in the component means, so you can design a circuit around the microcontroller. For example, in the VCC I connected the positive end of the power supply, and on the GND the other end.
There is a block diagram in the datasheet that specifies every part inside the component. As you can imagine there is an entire world inside this tiny component.
Programming the Board
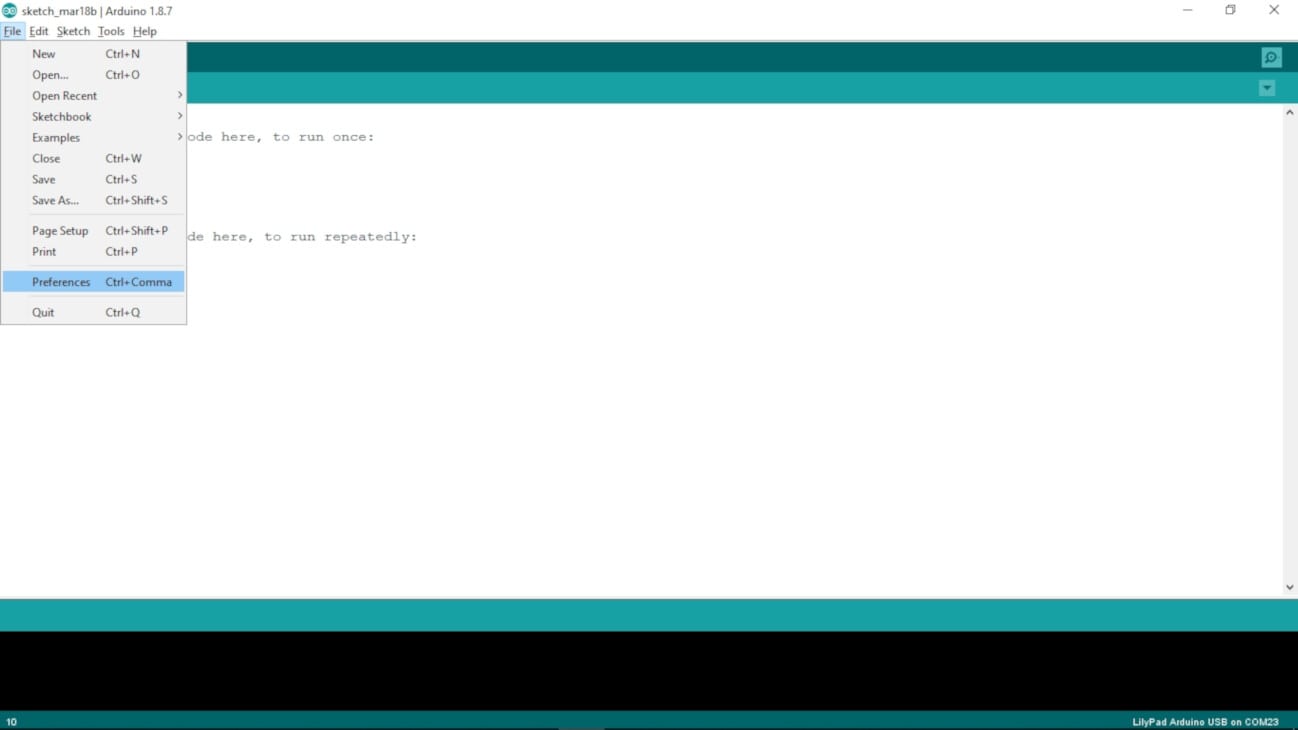
1- Go to File > Preferences
2- On the Preferences windows, on the Additional Boards Manager URLs section, paste the followed link (Note: if you have already a URL like I did, just write a "," at the end of the previous one and then paste the new one):
https://raw.githubusercontent.com/damellis/attiny/ide-1.6.x-boards-manager/package_damellis_attiny_index.json

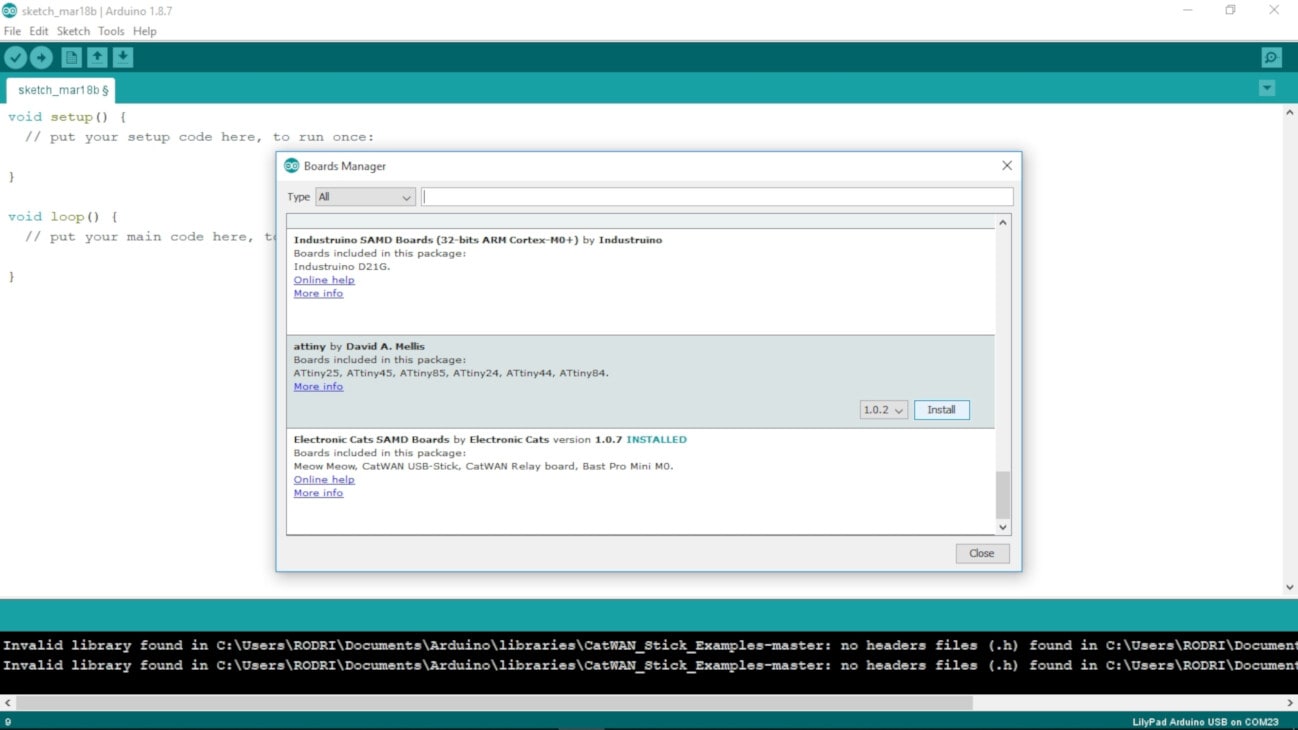
3- Go to Tools > Board > Boards Manager...

4- On the Boards Manager window, look for the "attiny" by David A. Mellis package, and click Install. Then close the window.
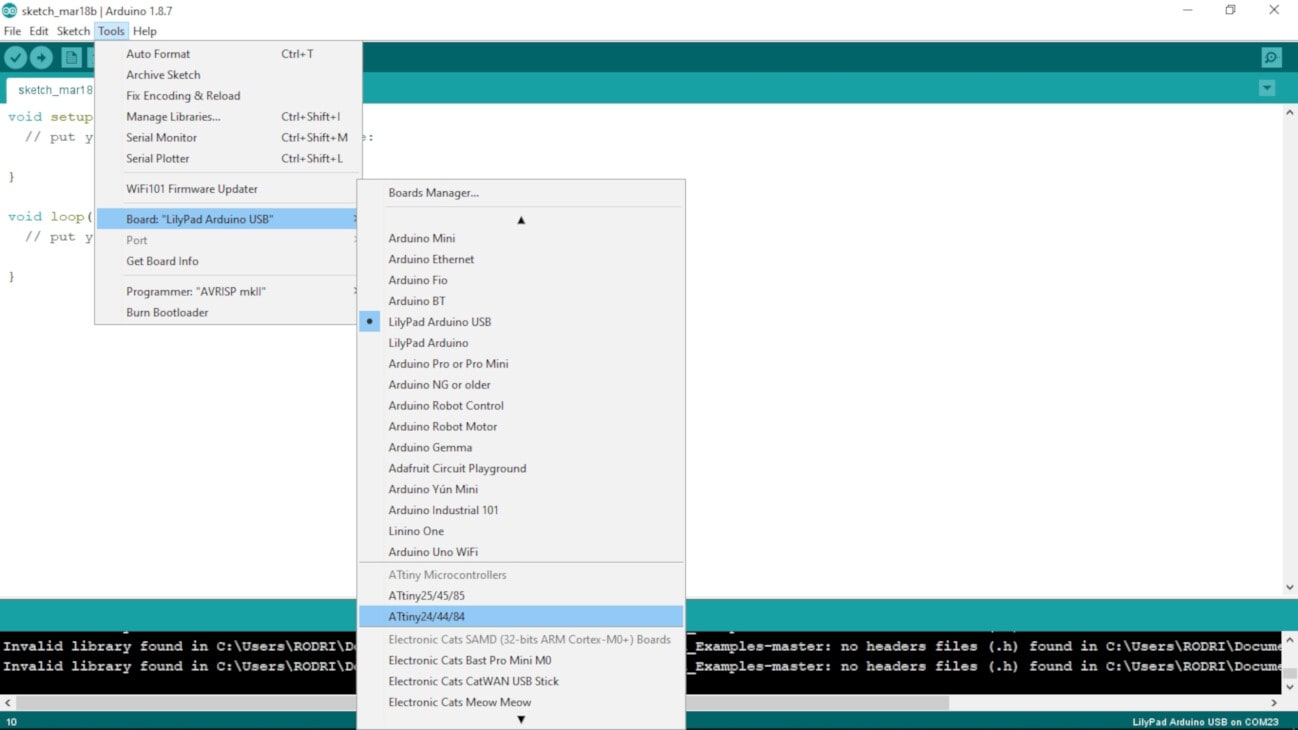
5-Go again to Tools > Board, and select the ATtiny24/44/84 under the ATtiny Microcontrollers section.
Connect the BoredBoard
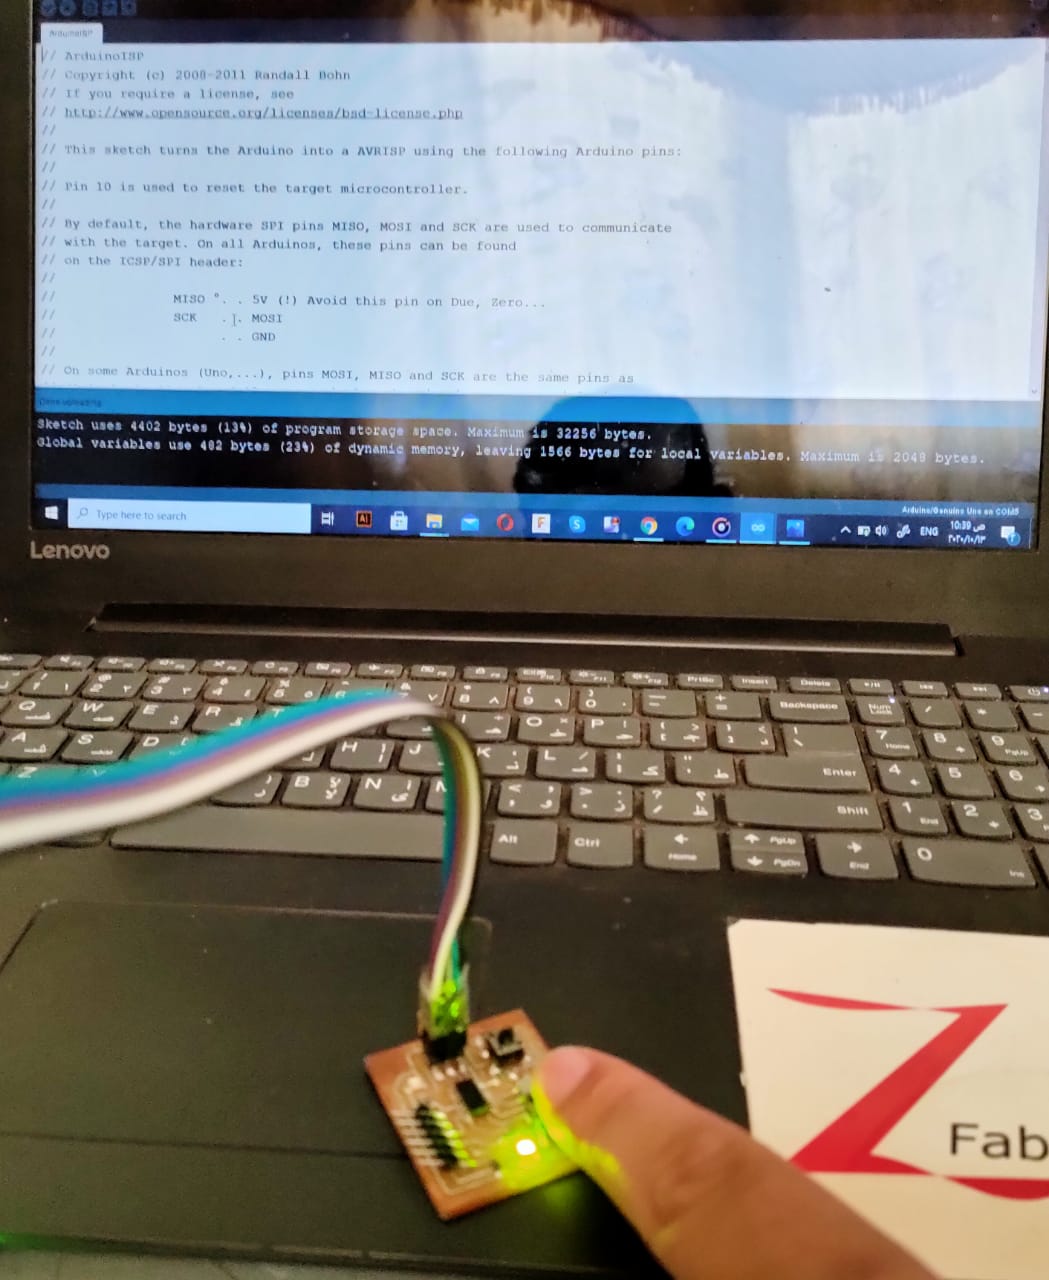
This week’s assignment divided into two parts, first is programming my FABISP I made weeks ago with an Arduino, second is programming my my board using my ISP with Embedded C language.
My FABISP with Arduino.
In the last weeks when I produced my first FABISP, I programmed it using Arduino in order to be able to use it as a programmer in the future. You can find All the steps and photos Here
Programming my board with the FABISP using Embedded C language.
I decided to use the embedded C programming to program my board to light the LED while the button pressed
then when completing it I will upgrade the codeTo be able to do that successfully,and to be able to give your board orders, you have to do the following steps:
1. Write C-Code, save it in a separate folder with .c extension.
At ATTINY44 we have two parts of pins A and B, And I have connected the LED with Pin PA2 with the button on Pin PA7, so that the LED lights up whenever button is pressed.

• These are the pins of port A. To configure a pin as an output, you have to assign
that pin in port A register a zero (to remember Output = 0).
• To configure a pin as an output, you have to assign that pin in port A register a one
(to remember Input = 1).
and here
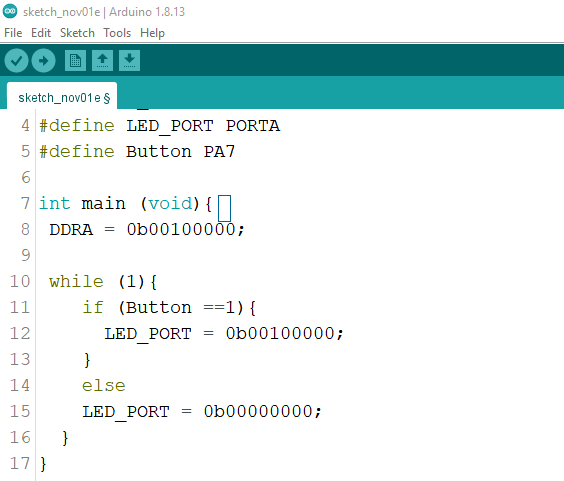
DDRA = 0b00100000;//set PA2 as output
Here I associate LED with a conditional sentence with a button that becomes the PA2 as output, and the led lights up when you press the button
while (1){

    if (Button ==1){

      LED_PORT = 0b00100000;
//To adjust the PA2 output in case the button is pressed
    }

    else

    LED_PORT = 0b00000000;
//set PA2 is off  off when the BUTTON is not pressed
Code Arduino
#include


#define F_CPU20000UL

#define LED_PORT PORTA

#define Button PA7


int main (void){

 DDRA = 0b00100000;
//set PA2 output


 while (1){

    if (Button ==1){

      LED_PORT = 0b00100000;
//To adjust the PA2 output in case the button is pressed
    }

    else

    LED_PORT = 0b00000000;
//set PA2 is off  off when the BUTTON is not pressed
  }

}
2. Calculate the fuses for your microcontroller.
I used this link to calculate the fuses, its simple calculator, you have to select your microcontroller and the clock you’ve used in your board. And from the datasheet you should know what should be checked (programmed (0)), and what should uncheck (unprogrammed (1)).

3. Prepare your makefile and add it to the same folder with NO extension.
The makefile basically is a text file has instructions for a specific project. It will be read and executed using the make command.
I used neil’s makefile. And edit it to suit my program. I changed the program name to match the C-Code , and deleted all unnecessary lines (kept the first 4 lines for configuring the Makefile and the two lines for program usbtiny and usbtiny fuses).
So, you can see my make file below.

4. Install the drivers and packages to your PC.
This is the same step I did in programming my FABISP Here, but I repeated it since I used another PC
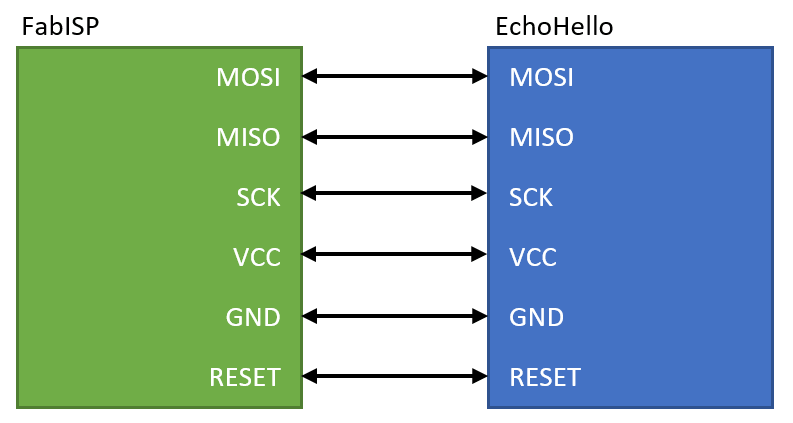
5. Connect your board to the FABISB using the ISP pin headers, and connect the FABISP to the PC using the USB port.
6. Write the make command.
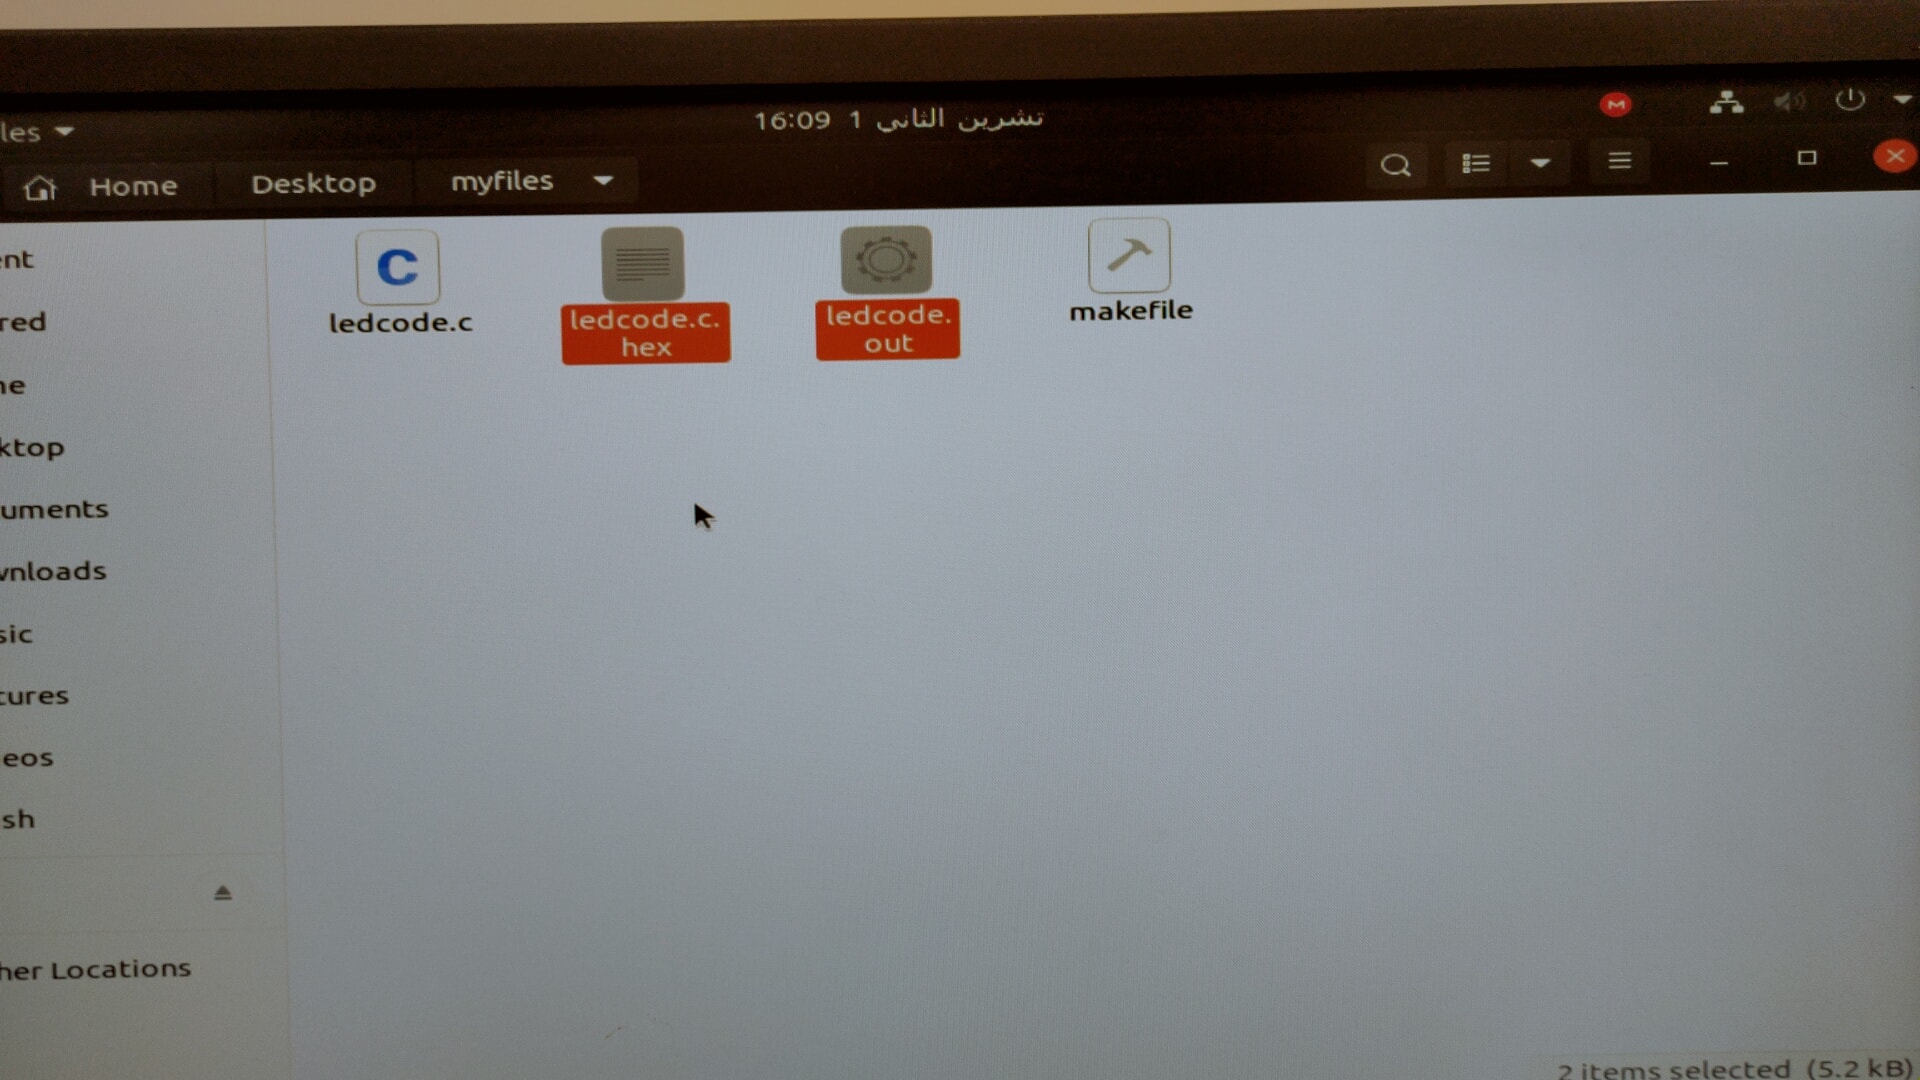
The make command reads the make file, and creates a .hex & .out file from it.
So, after navigating the folder you created in your PC (that contains the makefile and the C-Code), this step should create a .hex & .out files .
7. then write the make (program name) , which is the name you used in the makefile in program lines. and then your board should start working depending on the instructions you wrote in the code.
yazan@YazanPC:~$ cd Desktop/myfiles/
yazan@YazanPC:~/Desktop/myfiles$ sudo apt-get install flex byacc bison gcc libusb-dev avrdude
[sudo] password for yazan:
Reading package lists... Done
Building dependency tree
Reading state information... Done
bison is already the newest version (2:3.5.1+dfsg-1).
flex is already the newest version (2.6.4-6.2).
gcc is already the newest version (4:9.3.0-1ubuntu2).
libusb-dev is already the newest version (2:0.1.12-32).
avrdude is already the newest version (6.3-20171130+svn1429-2).
byacc is already the newest version (20140715-1build1).
The following packages were automatically installed and are no longer required:
libfprint-2-tod1 libnvidia-cfg1-440 libnvidia-common-440 libnvidia-extra-440
libnvidia-fbc1-440 libnvidia-fbc1-440:i386 libnvidia-gl-440:i386
libnvidia-ifr1-440:i386 libxnvctrl0 nvidia-kernel-source-440 nvidia-prime
nvidia-settings screen-resolution-extra xserver-xorg-video-nvidia-440
Use 'sudo apt autoremove' to remove them.
0 upgraded, 0 newly installed, 0 to remove and 19 not upgraded.
yazan@YazanPC:~/Desktop/myfiles$ sudo apt-get install gcc-avr
Reading package lists... Done
Building dependency tree
Reading state information... Done
gcc-avr is already the newest version (1:5.4.0+Atmel3.6.1-2build1).
The following packages were automatically installed and are no longer required:
libfprint-2-tod1 libnvidia-cfg1-440 libnvidia-common-440 libnvidia-extra-440
libnvidia-fbc1-440 libnvidia-fbc1-440:i386 libnvidia-gl-440:i386
libnvidia-ifr1-440:i386 libxnvctrl0 nvidia-kernel-source-440 nvidia-prime
nvidia-settings screen-resolution-extra xserver-xorg-video-nvidia-440
Use 'sudo apt autoremove' to remove them.
0 upgraded, 0 newly installed, 0 to remove and 19 not upgraded.
yazan@YazanPC:~/Desktop/myfiles$ sudo apt-get install avr-libc
Reading package lists... Done
Building dependency tree
Reading state information... Done
avr-libc is already the newest version (1:2.0.0+Atmel3.6.1-2).
The following packages were automatically installed and are no longer required:
libfprint-2-tod1 libnvidia-cfg1-440 libnvidia-common-440 libnvidia-extra-440
libnvidia-fbc1-440 libnvidia-fbc1-440:i386 libnvidia-gl-440:i386
libnvidia-ifr1-440:i386 libxnvctrl0 nvidia-kernel-source-440 nvidia-prime
nvidia-settings screen-resolution-extra xserver-xorg-video-nvidia-440
Use 'sudo apt autoremove' to remove them.
0 upgraded, 0 newly installed, 0 to remove and 19 not upgraded.
yazan@YazanPC:~/Desktop/myfiles$ sudo apt-get install libc6-dev
Reading package lists... Done
Building dependency tree
Reading state information... Done
libc6-dev is already the newest version (2.31-0ubuntu9.1).
The following packages were automatically installed and are no longer required:
libfprint-2-tod1 libnvidia-cfg1-440 libnvidia-common-440 libnvidia-extra-440
libnvidia-fbc1-440 libnvidia-fbc1-440:i386 libnvidia-gl-440:i386
libnvidia-ifr1-440:i386 libxnvctrl0 nvidia-kernel-source-440 nvidia-prime
nvidia-settings screen-resolution-extra xserver-xorg-video-nvidia-440
Use 'sudo apt autoremove' to remove them.
0 upgraded, 0 newly installed, 0 to remove and 19 not upgraded.
yazan@YazanPC:~/Desktop/myfiles$ make
make: * No rule to make target 'hello.ftdi.44.echo.c', needed by 'hello.ftdi.44.echo.out'. Stop.
yazan@YazanPC:~/Desktop/myfiles$ make
make: * No rule to make target 'ledcode.echo.c', needed by 'ledcode.echo.out'. Stop.
yazan@YazanPC:~/Desktop/myfiles$ make
make: Warning: File 'ledcode.c' has modification time 6814 s in the future
avr-gcc -mmcu=attiny44 -Wall -Os -DF_CPU=20000000 -I./ -o ledcode.out ledcode.c
avr-objcopy -O ihex ledcode.out ledcode.c.hex;\
avr-size --mcu=attiny44 --format=avr ledcode.out
AVR Memory Usage
----------------
Device: attiny44
Program: 64 bytes (1.6% Full)
(.text + .data + .bootloader)
Data: 0 bytes (0.0% Full)
(.data + .bss + .noinit)
make: warning: Clock skew detected. Your build may be incomplete.
yazan@YazanPC:~/Desktop/myfiles$ make usbtiny
make: * No rule to make target 'usbtiny'. Stop.
yazan@YazanPC:~/Desktop/myfiles$ program-usbtiny
program-usbtiny: command not found
yazan@YazanPC:~/Desktop/myfiles$ make program-usbtiny
make: Warning: File 'ledcode.c' has modification time 6738 s in the future
avr-gcc -mmcu=attiny44 -Wall -Os -DF_CPU=20000000 -I./ -o ledcode.out ledcode.c
avr-objcopy -O ihex ledcode.out ledcode.c.hex;\
avr-size --mcu=attiny44 --format=avr ledcode.out
AVR Memory Usage
----------------
Device: attiny44
Program: 64 bytes (1.6% Full)
(.text + .data + .bootloader)
Data: 0 bytes (0.0% Full)
(.data + .bss + .noinit)
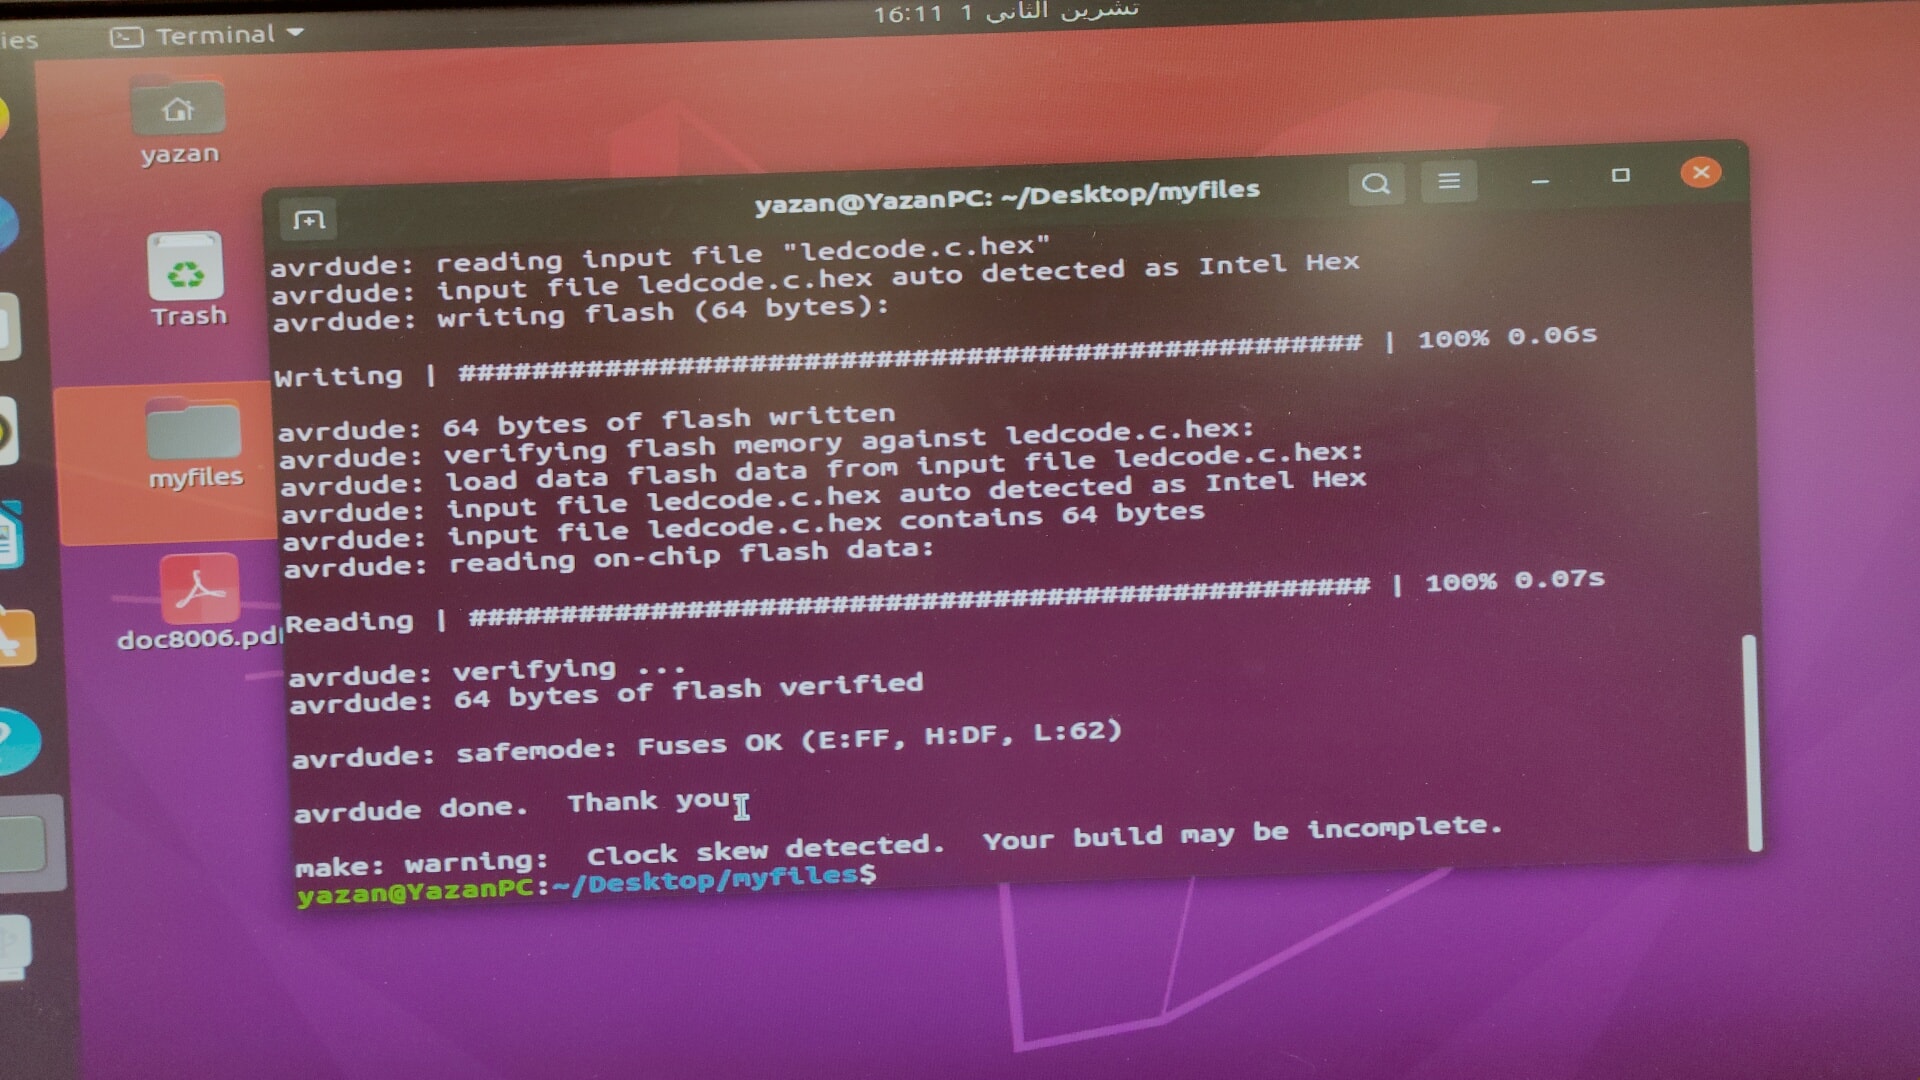
avrdude -p t44 -P usb -c usbtiny -U flash:w:ledcode.c.hex
avrdude: AVR device initialized and ready to accept instructions
Reading | ################################################## | 100% 0.00s
avrdude: Device signature = 0x1e9207 (probably t44)
avrdude: NOTE: "flash" memory has been specified, an erase cycle will be performed
To disable this feature, specify the -D option.
avrdude: erasing chip
avrdude: reading input file "ledcode.c.hex"
avrdude: input file ledcode.c.hex auto detected as Intel Hex
avrdude: writing flash (64 bytes):
Writing | ################################################## | 100% 0.06s
avrdude: 64 bytes of flash written
avrdude: verifying flash memory against ledcode.c.hex:
avrdude: load data flash data from input file ledcode.c.hex:
avrdude: input file ledcode.c.hex auto detected as Intel Hex
avrdude: input file ledcode.c.hex contains 64 bytes
avrdude: reading on-chip flash data:
Reading | ################################################## | 100% 0.07s
avrdude: verifying ...
avrdude: 64 bytes of flash verified
avrdude: safemode: Fuses OK (E:FF, H:DF, L:62)
avrdude done. Thank you.
make: warning: Clock skew detected. Your build may be incomplete.
yazan@YazanPC:~/Desktop/myfiles$ ng state information... Done
Command 'ng' not found, but can be installed with:
sudo apt install ng-common
yazan@YazanPC:~/Desktop/myfiles$ libc6-dev is already the newest version (2.31-0ubuntu9.1).
bash: syntax error near unexpected token `('
yazan@YazanPC:~/Desktop/myfiles$ The following packages were automatically installed and are no longer required:
Command 'The' not found, did you mean:
command 'he' from deb node-he (1.2.0-1)
command 'the' from deb the (3.3~rc1-3build1)
Try: sudo apt install
yazan@YazanPC:~/Desktop/myfiles$ libfprint-2-tod1 libnvidia-cfg1-440 libnvidia-common-440 libnvidia-extra-440
libfprint-2-tod1: command not found
yazan@YazanPC:~/Desktop/myfiles$ libnvidia-fbc1-440 libnvidia-fbc1-440:i386 libnvidia-gl-440:i386
libnvidia-fbc1-440: command not found
yazan@YazanPC:~/Desktop/myfiles$ libnvidia-ifr1-440:i386 libxnvctrl0 nvidia-kernel-source-440 nvidia-prime
libnvidia-ifr1-440:i386: command not found
yazan@YazanPC:~/Desktop/myfiles$ nvidia-settings screen-resolution-extra xserver-xorg-video-nvidia-440
nvidia-settings: invalid option: "screen-resolution-extra"
ERROR: Invalid commandline, please run `nvidia-settings --help` for usage information.
yazan@YazanPC:~/Desktop/myfiles$ Use 'sudo apt autoremove' to remove them.
Command 'Use' not found, did you mean:
command 'ase' from deb ase (3.19.0-1)
command 'nse' from deb ns2 (2.35+dfsg-3build1)
Try: sudo apt install
yazan@YazanPC:~/Desktop/myfiles$ 0 upgraded, 0
Here I've written a simple led code onto my Board so that it flashes every half second
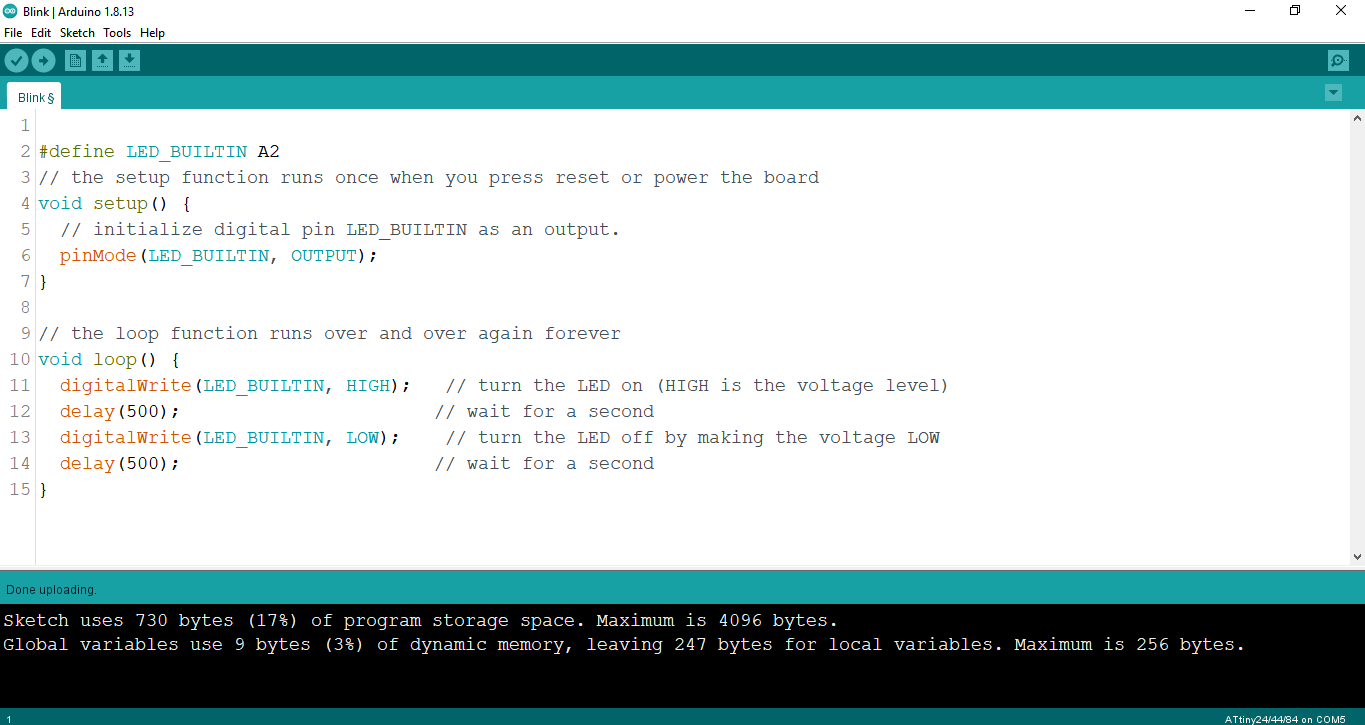
Code Arduino
    #define LED_BUILTIN A2
// the setup function runs once when you press reset or power the board
void setup() {
  // initialize digital pin LED_BUILTIN as an output.
  pinMode(LED_BUILTIN, OUTPUT);
}

// the loop function runs over and over again forever
void loop() {
  digitalWrite(LED_BUILTIN, HIGH);   // turn the LED on (HIGH is the voltage level)
  delay(500);                       // wait for a second
  digitalWrite(LED_BUILTIN, LOW);    // turn the LED off by making the voltage LOW
  delay(500);                       // wait for a second
}
5. Connect your board to the FABISB using the ISP pin headers, and connect the FABISP to the PC using the USB port.
6. Write the make command.
The make command reads the make file, and creates a .hex & .out file from it.
So, after navigating the folder you created in your PC (that contains the makefile and the C-Code), this step should create a .hex & .out files .
7. then write the make (program name) , which is the name you used in the makefile in program lines. and then your board should start working depending on the instructions you wrote in the code.
yazan@YazanPC:~$ cd Desktop/myfiles/
yazan@YazanPC:~/Desktop/myfiles$ sudo apt-get install flex byacc bison gcc libusb-dev avrdude
[sudo] password for yazan:
Reading package lists... Done
Building dependency tree
Reading state information... Done
bison is already the newest version (2:3.5.1+dfsg-1).
flex is already the newest version (2.6.4-6.2).
gcc is already the newest version (4:9.3.0-1ubuntu2).
libusb-dev is already the newest version (2:0.1.12-32).
avrdude is already the newest version (6.3-20171130+svn1429-2).
byacc is already the newest version (20140715-1build1).
The following packages were automatically installed and are no longer required:
libfprint-2-tod1 libnvidia-cfg1-440 libnvidia-common-440 libnvidia-extra-440
libnvidia-fbc1-440 libnvidia-fbc1-440:i386 libnvidia-gl-440:i386
libnvidia-ifr1-440:i386 libxnvctrl0 nvidia-kernel-source-440 nvidia-prime
nvidia-settings screen-resolution-extra xserver-xorg-video-nvidia-440
Use 'sudo apt autoremove' to remove them.
0 upgraded, 0 newly installed, 0 to remove and 19 not upgraded.
yazan@YazanPC:~/Desktop/myfiles$ sudo apt-get install gcc-avr
Reading package lists... Done
Building dependency tree
Reading state information... Done
gcc-avr is already the newest version (1:5.4.0+Atmel3.6.1-2build1).
The following packages were automatically installed and are no longer required:
libfprint-2-tod1 libnvidia-cfg1-440 libnvidia-common-440 libnvidia-extra-440
libnvidia-fbc1-440 libnvidia-fbc1-440:i386 libnvidia-gl-440:i386
libnvidia-ifr1-440:i386 libxnvctrl0 nvidia-kernel-source-440 nvidia-prime
nvidia-settings screen-resolution-extra xserver-xorg-video-nvidia-440
Use 'sudo apt autoremove' to remove them.
0 upgraded, 0 newly installed, 0 to remove and 19 not upgraded.
yazan@YazanPC:~/Desktop/myfiles$ sudo apt-get install avr-libc
Reading package lists... Done
Building dependency tree
Reading state information... Done
avr-libc is already the newest version (1:2.0.0+Atmel3.6.1-2).
The following packages were automatically installed and are no longer required:
libfprint-2-tod1 libnvidia-cfg1-440 libnvidia-common-440 libnvidia-extra-440
libnvidia-fbc1-440 libnvidia-fbc1-440:i386 libnvidia-gl-440:i386
libnvidia-ifr1-440:i386 libxnvctrl0 nvidia-kernel-source-440 nvidia-prime
nvidia-settings screen-resolution-extra xserver-xorg-video-nvidia-440
Use 'sudo apt autoremove' to remove them.
0 upgraded, 0 newly installed, 0 to remove and 19 not upgraded.
yazan@YazanPC:~/Desktop/myfiles$ sudo apt-get install libc6-dev
Reading package lists... Done
Building dependency tree
Reading state information... Done
libc6-dev is already the newest version (2.31-0ubuntu9.1).
The following packages were automatically installed and are no longer required:
libfprint-2-tod1 libnvidia-cfg1-440 libnvidia-common-440 libnvidia-extra-440
libnvidia-fbc1-440 libnvidia-fbc1-440:i386 libnvidia-gl-440:i386
libnvidia-ifr1-440:i386 libxnvctrl0 nvidia-kernel-source-440 nvidia-prime
nvidia-settings screen-resolution-extra xserver-xorg-video-nvidia-440
Use 'sudo apt autoremove' to remove them.
0 upgraded, 0 newly installed, 0 to remove and 19 not upgraded.
yazan@YazanPC:~/Desktop/myfiles$ make
make: * No rule to make target 'hello.ftdi.44.echo.c', needed by 'hello.ftdi.44.echo.out'. Stop.
yazan@YazanPC:~/Desktop/myfiles$ make
make: * No rule to make target 'ledcode.echo.c', needed by 'ledcode.echo.out'. Stop.
yazan@YazanPC:~/Desktop/myfiles$ make
make: Warning: File 'ledcode.c' has modification time 6814 s in the future
avr-gcc -mmcu=attiny44 -Wall -Os -DF_CPU=20000000 -I./ -o ledcode.out ledcode.c
avr-objcopy -O ihex ledcode.out ledcode.c.hex;\
avr-size --mcu=attiny44 --format=avr ledcode.out
AVR Memory Usage
----------------
Device: attiny44
Program: 64 bytes (1.6% Full)
(.text + .data + .bootloader)
Data: 0 bytes (0.0% Full)
(.data + .bss + .noinit)
make: warning: Clock skew detected. Your build may be incomplete.
yazan@YazanPC:~/Desktop/myfiles$ make usbtiny
make: * No rule to make target 'usbtiny'. Stop.
yazan@YazanPC:~/Desktop/myfiles$ program-usbtiny
program-usbtiny: command not found
yazan@YazanPC:~/Desktop/myfiles$ make program-usbtiny
make: Warning: File 'ledcode.c' has modification time 6738 s in the future
avr-gcc -mmcu=attiny44 -Wall -Os -DF_CPU=20000000 -I./ -o ledcode.out ledcode.c
avr-objcopy -O ihex ledcode.out ledcode.c.hex;\
avr-size --mcu=attiny44 --format=avr ledcode.out
AVR Memory Usage
----------------
Device: attiny44
Program: 64 bytes (1.6% Full)
(.text + .data + .bootloader)
Data: 0 bytes (0.0% Full)
(.data + .bss + .noinit)
avrdude -p t44 -P usb -c usbtiny -U flash:w:ledcode.c.hex
avrdude: AVR device initialized and ready to accept instructions
Reading | ################################################## | 100% 0.00s
avrdude: Device signature = 0x1e9207 (probably t44)
avrdude: NOTE: "flash" memory has been specified, an erase cycle will be performed
To disable this feature, specify the -D option.
avrdude: erasing chip
avrdude: reading input file "ledcode.c.hex"
avrdude: input file ledcode.c.hex auto detected as Intel Hex
avrdude: writing flash (64 bytes):
Writing | ################################################## | 100% 0.06s
avrdude: 64 bytes of flash written
avrdude: verifying flash memory against ledcode.c.hex:
avrdude: load data flash data from input file ledcode.c.hex:
avrdude: input file ledcode.c.hex auto detected as Intel Hex
avrdude: input file ledcode.c.hex contains 64 bytes
avrdude: reading on-chip flash data:
Reading | ################################################## | 100% 0.07s
avrdude: verifying ...
avrdude: 64 bytes of flash verified
avrdude: safemode: Fuses OK (E:FF, H:DF, L:62)
avrdude done. Thank you.
make: warning: Clock skew detected. Your build may be incomplete.
yazan@YazanPC:~/Desktop/myfiles$ ng state information... Done
Command 'ng' not found, but can be installed with:
sudo apt install ng-common
yazan@YazanPC:~/Desktop/myfiles$ libc6-dev is already the newest version (2.31-0ubuntu9.1).
bash: syntax error near unexpected token `('
yazan@YazanPC:~/Desktop/myfiles$ The following packages were automatically installed and are no longer required:
Command 'The' not found, did you mean:
command 'he' from deb node-he (1.2.0-1)
command 'the' from deb the (3.3~rc1-3build1)
Try: sudo apt install
yazan@YazanPC:~/Desktop/myfiles$ libfprint-2-tod1 libnvidia-cfg1-440 libnvidia-common-440 libnvidia-extra-440
libfprint-2-tod1: command not found
yazan@YazanPC:~/Desktop/myfiles$ libnvidia-fbc1-440 libnvidia-fbc1-440:i386 libnvidia-gl-440:i386
libnvidia-fbc1-440: command not found
yazan@YazanPC:~/Desktop/myfiles$ libnvidia-ifr1-440:i386 libxnvctrl0 nvidia-kernel-source-440 nvidia-prime
libnvidia-ifr1-440:i386: command not found
yazan@YazanPC:~/Desktop/myfiles$ nvidia-settings screen-resolution-extra xserver-xorg-video-nvidia-440
nvidia-settings: invalid option: "screen-resolution-extra"
ERROR: Invalid commandline, please run `nvidia-settings --help` for usage information.
yazan@YazanPC:~/Desktop/myfiles$ Use 'sudo apt autoremove' to remove them.
Command 'Use' not found, did you mean:
command 'ase' from deb ase (3.19.0-1)
command 'nse' from deb ns2 (2.35+dfsg-3build1)
Try: sudo apt install
yazan@YazanPC:~/Desktop/myfiles$ 0 upgraded, 0
Here I've written a simple led code onto my Board so that it flashes every half second
Code Arduino
#define LED_BUILTIN A2
// the setup function runs once when you press reset or power the board
void setup() {
// initialize digital pin LED_BUILTIN as an output.
pinMode(LED_BUILTIN, OUTPUT);
}
// the loop function runs over and over again forever
void loop() {
digitalWrite(LED_BUILTIN, HIGH); // turn the LED on (HIGH is the voltage level)
delay(500); // wait for a second
digitalWrite(LED_BUILTIN, LOW); // turn the LED off by making the voltage LOW
delay(500); // wait for a second
}
You can download my files here.
- Code-Turn on LED
- Makefile
- LDR Arduino Language
- you can check on group assignment press here